Almost every small-business owner we talk to has the same starting point: they know they "should be on Google" but don't know which Google to start with. Google sells half a dozen separate marketing tools, each with its own login flow, its own UI, and its own opinions about how setup should go. Done in the wrong order, you end up doing twice the work and still missing data. Done in the right order, the whole thing fits together so cleanly that you'll wonder why no one explained it like this before.
This guide is that explanation. It's written for someone setting these tools up for the first time: a brand-new business, or one that's been running for years on word of mouth and is finally taking digital seriously. Each section covers one tool: what it does, what you'll need before you sit down, exactly what to click, and how to verify it's working. The order matters: if you go top to bottom, each step's outputs feed the next one.
Set up the free four first: Business Profile, Search Console, Analytics 4, Tag Manager. They cost nothing and they're the foundation for everything else. Add Google Ads when you're ready to spend on paid traffic. Add Merchant Center only if you sell physical products online. In that order.
Before you start: the 15-minute setup checklist
Most of the setup time isn't the clicking. It's hunting down the same piece of information across four different account creation forms. Gather these once, in a single doc, and you'll move through the rest of this guide twice as fast:
- Legal business name, exactly as it appears on your business license or tax filings.
- Physical address (if you have one customers can visit), required for Google Business Profile.
- Phone number the business answers (not your personal cell unless that's truly the business line).
- Website URL, including whether it's
https://and whether the canonical version useswww.or not. Pick one and use the same one everywhere. - Domain registrar login (GoDaddy, Namecheap, Cloudflare, Squarespace Domains, etc.). You'll need to add DNS records during Search Console verification.
- A business credit card — only needed when you set up Google Ads (and optionally Workspace), but easier to find now than mid-setup.
- Time zone and currency the business reports in. These can't be easily changed in Google Ads once set, so get them right the first time.
One more thing before you create any accounts: decide who owns the Google account that owns everything else. The next section is the most important one in this guide.
Pick the right Google account first
Every Google product is tied to a Google account. Whichever account creates the property owns it. So before you click "Sign up" on a single tool, decide which account is going to be the permanent owner of your business's Google footprint.
The wrong answer: your personal Gmail. The right answer: a Google account in the business's name, that more than one person at the business can access if they need to.
Two reasonable ways to do this:
- Free path (simplest). Create a new free Gmail account at accounts.google.com/signup using a name like
marketing@gmail.comwith your business name prefixed (e.g.acmeclinic.marketing). Costs nothing. Works for every Google marketing tool. You can share the password with a trusted partner or accountant if needed. - Branded path (recommended once you're sure about the business). Sign up for Google Workspace at $7/user/month, which gives you a branded email like
info@yourbusiness.combacked by Gmail. Use that branded address to own every Google marketing property. The big benefit: when an employee leaves, you keep the account.
If you let an outside developer, freelancer, or agency create these accounts under their Google login "to save you time," you will spend the next two years trying to get them back. We see this on roughly half of new client onboardings. Own the account. Grant access to anyone helping — our guide to granting agency access the right way covers exactly how.
Once you have the business Google account ready, stay signed into it for the rest of this guide. Every "Sign up" link from here on should be done from that account.
Set up Google Business Profile
Google Business Profile (GBP) is the listing that shows up on Google Maps and in the right-hand "knowledge panel" when someone searches for your business name. For any local business, this is the single highest-leverage thing you can do on Google — it's free, it directly drives calls and direction requests, and it shows up before paid ads for branded searches.
Step 1: Create or claim your listing
Go to google.com/business and click Manage now. Search for your business name. One of two things happens:
- Google already has a listing for you (sometimes auto-generated from public data). You'll see it in the dropdown. Click it and follow the prompts to claim it.
- No listing exists yet. Click "Add your business to Google" and step through the create flow.
Step 2: Enter your core business information
Google will ask for your business name, primary category, address (or service area if you don't have a storefront customers visit), phone, and website. Be precise:
- Business name: Exactly your legal name. Don't add keywords like "Best Dental Clinic in Phoenix." Google will flag and demote that.
- Primary category: The most specific match. "Dental clinic" not "Health". You can add up to 9 additional categories later.
- Address: Match this character-for-character with how it appears on your website, in directories, and on your business license. This is called NAP consistency (Name, Address, Phone) and Google uses it to confirm you're real.
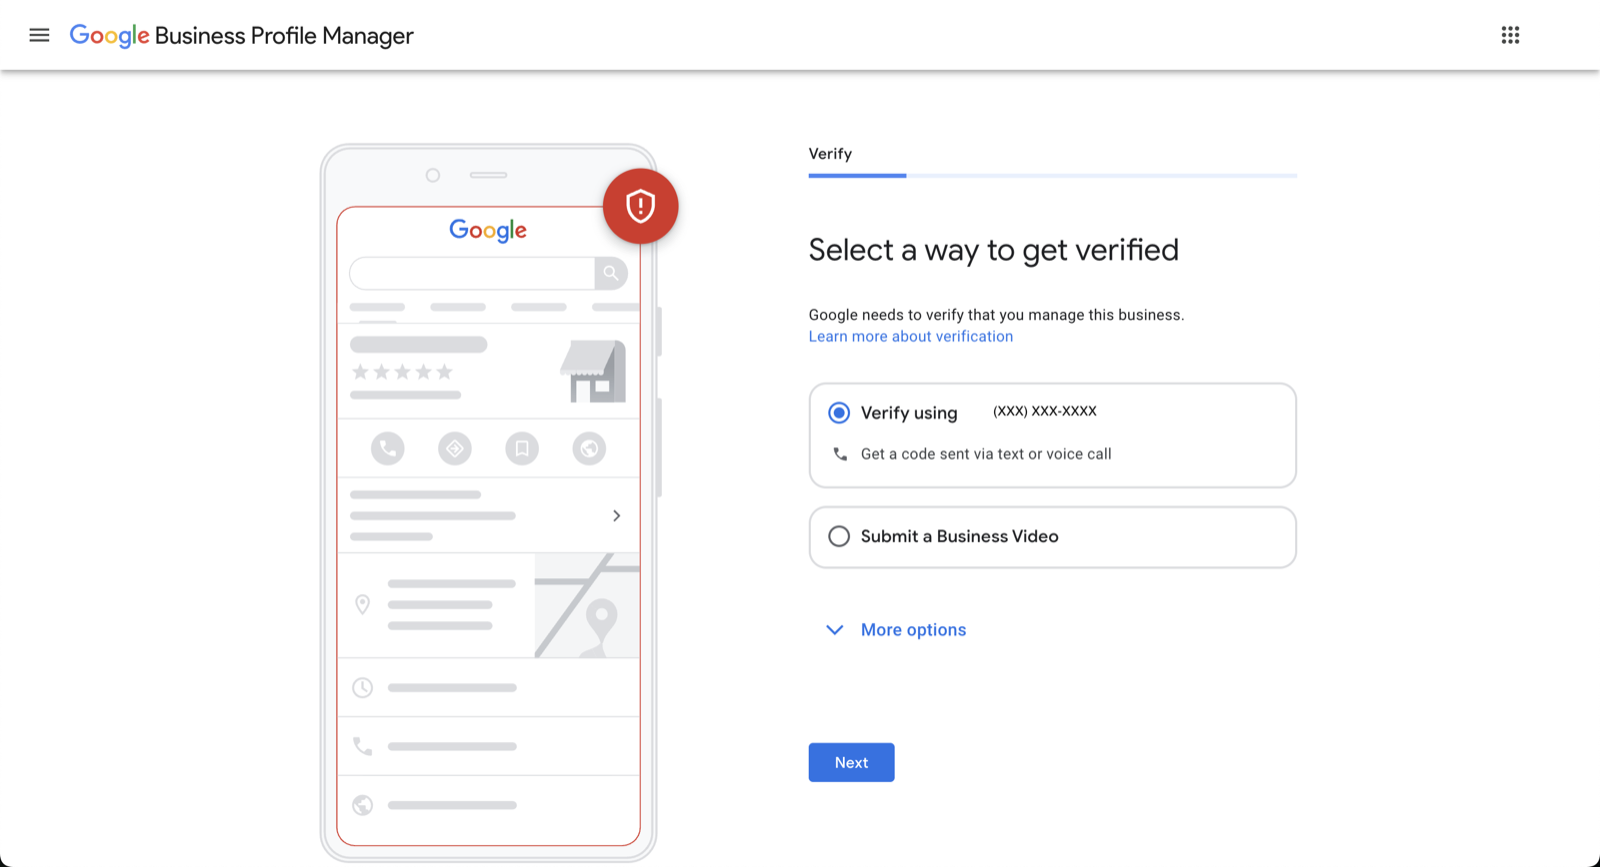
Step 3: Verify ownership
Google will offer one or more verification methods depending on your business type:
- Postcard (most common): Google mails a 5-digit code to your address. Arrives in 5–14 business days. Enter the code at business.google.com when it arrives.
- Video verification (increasingly common): Record a short video showing your storefront signage, your tools/equipment, and yourself signed into the business account. Approved in a few business days.
- Phone or email (rare): Available for some categories. Use it if offered.
Start verification on day one of setup. The postcard is on the slowest path of this whole guide — there's no reason to wait. While the postcard is in transit, finish the other sections of this guide.
Step 4: Complete your profile to 100%
Once verified, fill out everything. Google's algorithm visibly favors complete profiles, and customers convert on completeness too. Specifically:
- Hours, including special holiday hours.
- Services or products with short descriptions and (for services) starting prices.
- Photos: exterior, interior, team, product/service in action. At least 10 to start.
- Attributes: wheelchair access, free Wi-Fi, payment methods, etc. Choose every one that applies.
- Business description: 750 characters max. Plain-English, no keyword stuffing.
- Booking link / appointment URL, if you use a scheduling tool.
Step 5: Get into the rhythm
GBP isn't a "set it and forget it" tool. To stay competitive in local search, plan to:
- Respond to every review, positive or negative, within 48 hours.
- Post a weekly update via the Posts feature — an offer, an event, a new service, a photo.
- Answer questions in the Q&A section (you can pre-empt common ones by posting questions and answering them yourself from the owner account, fully allowed).
Reference: Google's official guide to creating a Business Profile.
Set up Google Search Console
Google Search Console (GSC) is Google's free SEO tool. It tells you which keywords people search to find your site, which of your pages rank for those keywords, your average position on Google, and any technical problems Google has crawling your site. If Business Profile is your local presence, Search Console is your organic-search presence. Free, no ad spend, gives you data Google Analytics can't.
Step 1: Add your property
Go to search.google.com/search-console and sign in with your business Google account. Click Add property. You'll be offered two property types:
- Domain property (recommended): Covers every subdomain (
www,blog,shop) and bothhttpandhttps. Verified via DNS. Choose this one. - URL-prefix property: Only covers the exact URL prefix you enter. Easier to verify (you can do it through Google Analytics or Tag Manager) but only sees one slice of your site.
Enter just your domain: yourbusiness.com, no https:// or www.
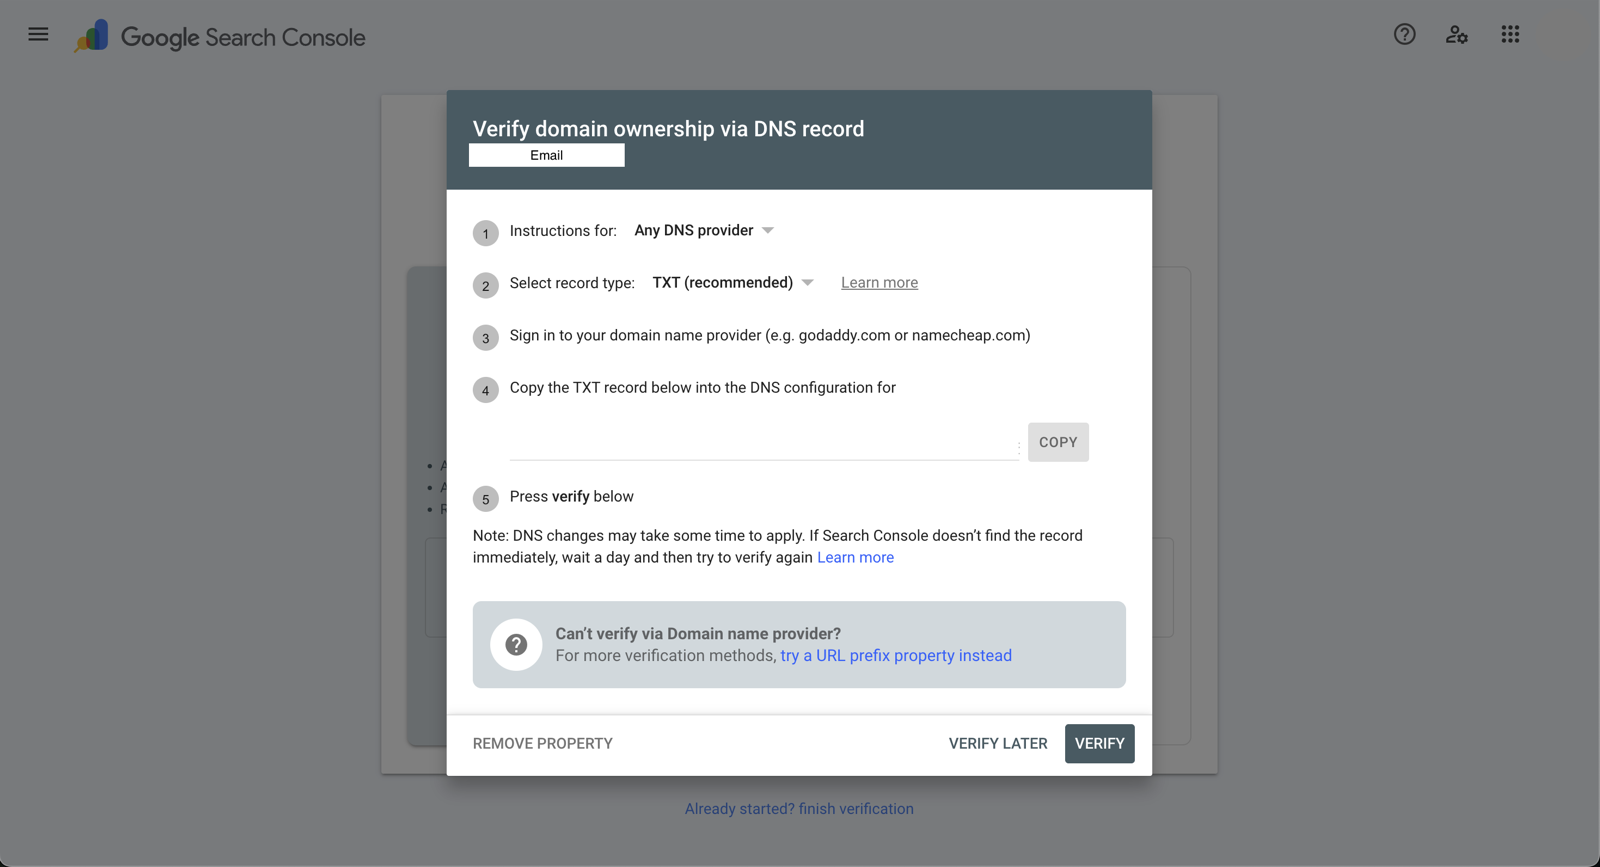
Step 2: Verify via DNS
Google will give you a TXT record that looks something like:
google-site-verification=AbCdEfGhIjKlMnOpQrStUvWxYz1234567890Log into your domain registrar (GoDaddy, Namecheap, Cloudflare, Squarespace Domains — wherever you bought the domain). Find the DNS settings for your domain and add a new record:
- Type: TXT
- Host / Name:
@(or your bare domain — registrars vary) - Value: the full string Google gave you
- TTL: 1 hour (or default)
Save the record, wait 5–60 minutes for DNS to propagate, then click Verify back in Search Console. Done. Leave the TXT record in place. Removing it un-verifies you.
Step 3: Submit your sitemap
In Search Console, click Sitemaps in the left rail. Enter your sitemap URL (usually sitemap.xml) and submit. If you don't have a sitemap, ask your developer or check your site builder's settings. Almost every modern platform generates one automatically at /sitemap.xml.
Step 4: Wait a week, then look at the data
Google needs a few days to start populating reports. After about a week, the most useful screens are:
- Performance: Which queries bring people to your site, average position, click-through rate.
- Pages (under Indexing): Which pages Google has indexed, which it hasn't, and why.
- Core Web Vitals: Whether your site is fast enough.
- Mobile usability: Whether your site works on phones.
Reference: Google's Search Console getting-started guide.
Set up Google Analytics 4 (GA4)
Google Analytics 4 (GA4) is the measurement system of record for your website. Every conversation about marketing performance — paid or organic, traffic or leads — happens on top of GA4 data. The earlier you set it up, the more historical data you'll have when you start needing to look at trends.
Note: GA4 replaced the older "Universal Analytics" (UA) product in 2023. If anything tells you to set up "UA-XXXXXXXX-X" tracking IDs, it's out of date. Only GA4 ("G-XXXXXXX" Measurement IDs) is supported now.
Step 1: Create your GA4 account and property
Go to analytics.google.com and sign in. Click Start measuring (or Admin → Create → Account if you've used GA before).
- Account name: Your company name. Accounts can hold multiple properties (e.g. one for your main site and one for a microsite).
- Property name: Usually your main domain (
yourbusiness.com). - Reporting time zone: Whatever you report your business in.
- Currency: Match your business currency so revenue events report correctly.
Step 2: Add a web data stream
Once the property exists, GA4 asks where data comes from. Choose Web. Enter your website URL and a stream name. Save.
You'll now land on a page showing your Measurement ID — a string in the format G-XXXXXXXXXX. Copy it and paste it somewhere safe. You'll need it in the next section (Tag Manager).
GA4 will offer to give you a snippet of "Google tag" code to paste into your site's <head>. Don't paste it. We're going to load GA4 through Google Tag Manager in the next section instead. If you paste this snippet AND set up GTM, you'll end up double-counting every event for the rest of time.
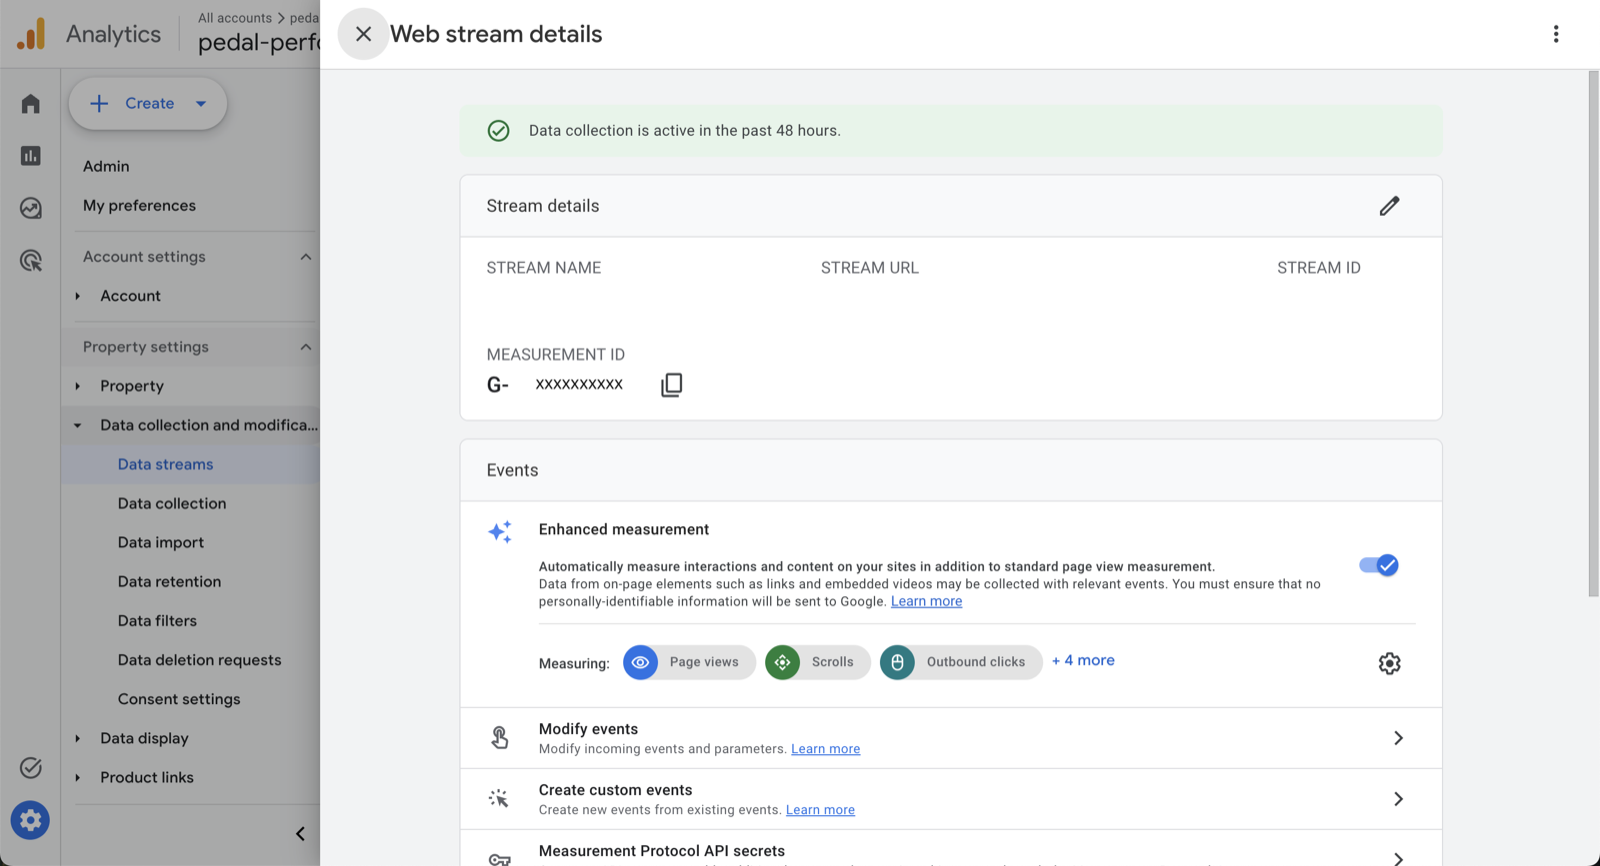
Step 3: Turn on Enhanced Measurement
Inside your web data stream settings, find the Enhanced measurement toggle. Turn it on. This auto-fires events for page views, scrolls, outbound link clicks, file downloads, and on-site search, for free, with no extra setup. Most small businesses never need anything beyond Enhanced Measurement for their first year.
Step 4: Set basic data settings
In Admin → Data Settings:
- Data Retention: change from the default 2 months to 14 months. (Google defaults to the shorter setting, which deletes your user-level data after 2 months. There is no reason to leave it short.)
- Google signals data collection: turn on if you plan to run ads. It powers demographics and cross-device reporting.
Reference: Google Analytics 4 setup assistant.
Set up Google Tag Manager
Google Tag Manager (GTM) is a "tag container" — a single piece of code you install once on your website that then lets you load and manage every other marketing tag (GA4, Google Ads conversion pixel, Meta Pixel, LinkedIn Insight Tag, Hotjar, anything) without touching the site code again. The 30 minutes you spend setting it up will save you 30 hours over the next few years.
Step 1: Create a GTM account and container
Go to tagmanager.google.com and click Create Account.
- Account name: Your company name (one account per company, even if you have multiple sites).
- Container name: Your domain (one container per site).
- Target platform: Web.
GTM will assign you a Container ID in the format GTM-XXXXXXX.
Step 2: Install the GTM snippet on your site
GTM gives you two snippets. One goes inside the <head> tag (as high as possible). The other goes immediately after the opening <body> tag. Both must appear on every page of your site.
The <head> snippet looks like this:
<!-- Google Tag Manager -->
<script>(function(w,d,s,l,i){w[l]=w[l]||[];w[l].push({'gtm.start':
new Date().getTime(),event:'gtm.js'});var f=d.getElementsByTagName(s)[0],
j=d.createElement(s),dl=l!='dataLayer'?'&l='+l:'';j.async=true;j.src=
'https://www.googletagmanager.com/gtm.js?id='+i+dl;f.parentNode.insertBefore(j,f);
})(window,document,'script','dataLayer','GTM-XXXXXXX');</script>
<!-- End Google Tag Manager -->
The <body> snippet looks like this:
<!-- Google Tag Manager (noscript) -->
<noscript><iframe src="https://www.googletagmanager.com/ns.html?id=GTM-XXXXXXX"
height="0" width="0" style="display:none;visibility:hidden"></iframe></noscript>
<!-- End Google Tag Manager (noscript) -->
How to install depends on your platform:
- Shopify: Online Store → Themes → Edit code → paste into
theme.liquid. Or use the free "Google & YouTube" channel which adds GTM for you. - Squarespace: Settings → Advanced → Code Injection. Header for the first snippet, Footer for the second.
- Wix: Marketing & SEO → Marketing Integrations → Google Tag Manager: paste the Container ID, Wix injects both snippets.
- WordPress: Use a free plugin like "GTM4WP" or "Site Kit by Google." Paste the Container ID and the plugin handles the install.
- Webflow: Project Settings → Custom Code. Header for the first, Footer for the second.
- Custom-built site: Your developer pastes these into the site template. One-time job, usually billable as 30 minutes.
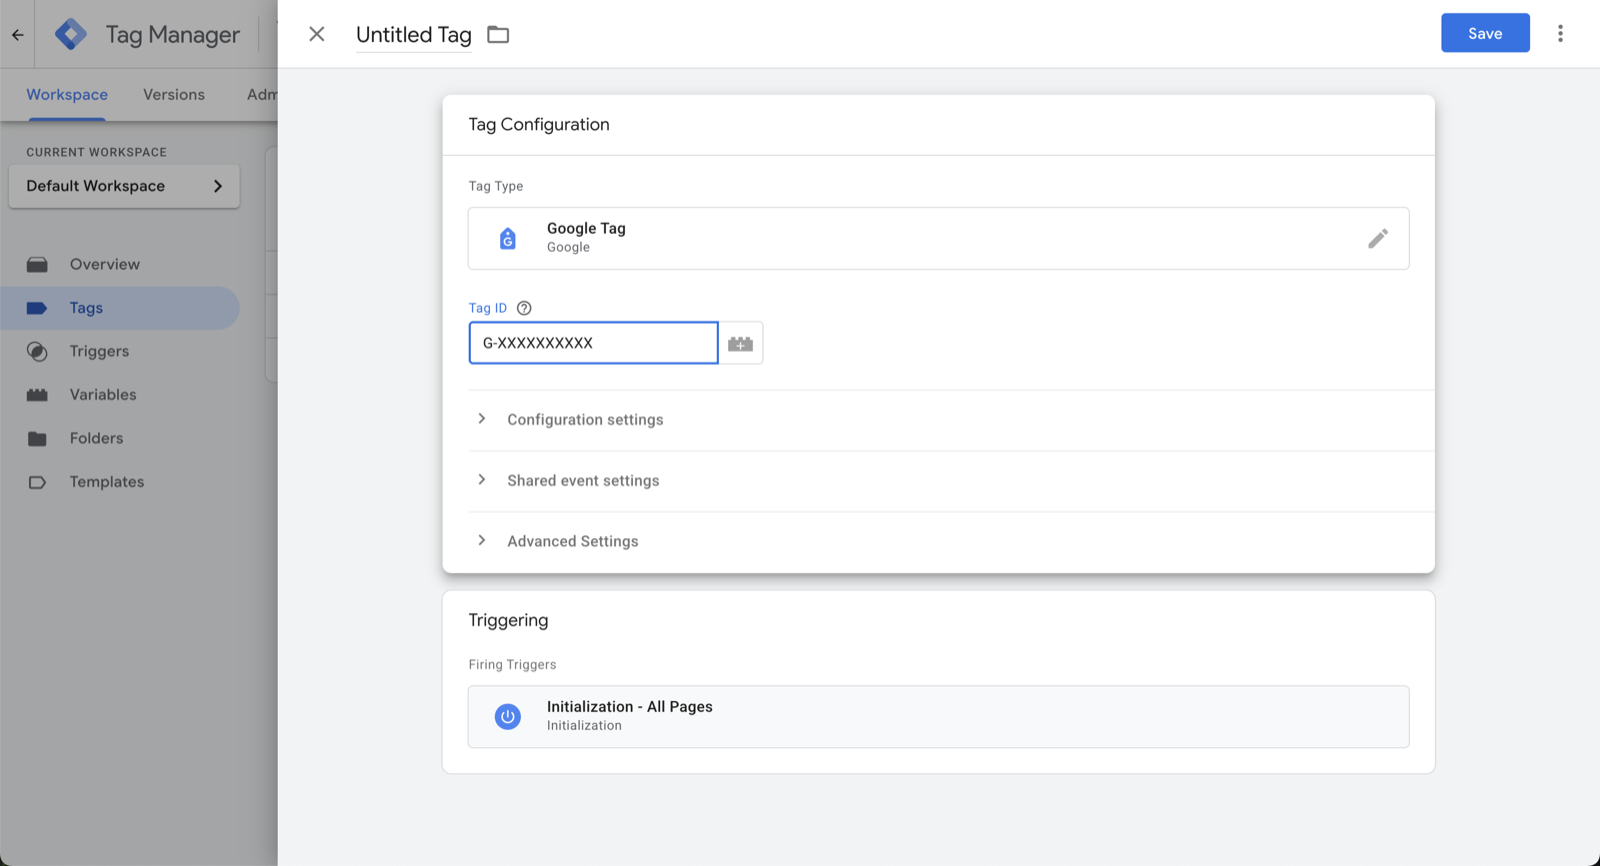
Step 3: Add a Google tag for GA4
Back in GTM, click Tags → New:
- Tag type: Google Tag (the modern recommended tag — it replaces the older "GA4 Configuration" tag).
- Tag ID: paste your GA4 Measurement ID (
G-XXXXXXXXXX) from the previous section. - Trigger: All Pages (Initialization — All Pages).
- Name the tag something like
GA4 - Google Tagand save.
Step 4: Preview, then publish
Click Preview in the top right of GTM. Enter your site URL. A new tab opens with your site and a debug panel showing which tags fired on which page. Confirm GA4 - Google Tag shows as fired on the page load.
Once preview looks right, close it and click Submit. Name the version (e.g. "Initial GA4 install"), and publish. Tags are live the moment you publish.
Step 5: Verify GA4 is receiving data
Go back to Google Analytics. Under Reports → Realtime you should see yourself as an active user within a minute or two of loading the site. If you see traffic, GA4 + GTM are wired up correctly. If not, check the GTM Preview panel for errors and confirm the Measurement ID matches exactly.
This is the moment your marketing stack stops requiring developer help. Every future tag — Google Ads conversion pixel, Meta Pixel, LinkedIn Insight, Hotjar, a custom click event, anything — is added inside the GTM UI in a few minutes. The site code never changes.
Reference: Google Tag Manager: install and set up a container.
Set up Google Ads
Google Ads is where you pay for traffic — search ads on Google.com, display ads across the web, YouTube ads, and (via Performance Max) ads that run across every Google surface. Before you spend a dollar, the account itself needs to be set up correctly. Ad strategy is its own topic; this section is about getting the account ready so the strategy work isn't built on a broken foundation. (Once the account has spend history, here’s how to read a Google Ads audit of it.)
Step 1: Create the account in Expert Mode
Go to ads.google.com and click Start now. Google will push you toward "Smart Campaigns," a stripped-down interface aimed at non-marketers. Skip it. Scroll down or look for the link that says "Switch to Expert Mode" or "Create an account without a campaign."
Smart Campaigns can't be converted to a normal Google Ads account later, and they hide most of the controls that make Ads worth using. Always start in Expert Mode, even if you're not running campaigns yet.
Step 2: Set account basics
- Billing country: Your business's country.
- Time zone: Your business's time zone. This can't be changed later.
- Currency: Your business's currency. This also can't be changed later.
Step 3: Add billing
Tools (the wrench icon) → Billing → Summary → Add payment method. You can pay by credit card or set up monthly invoicing if you qualify (usually requires running ~$5K+/month). For most new businesses, a credit card is fine.
Step 4: Link Google Ads to GA4
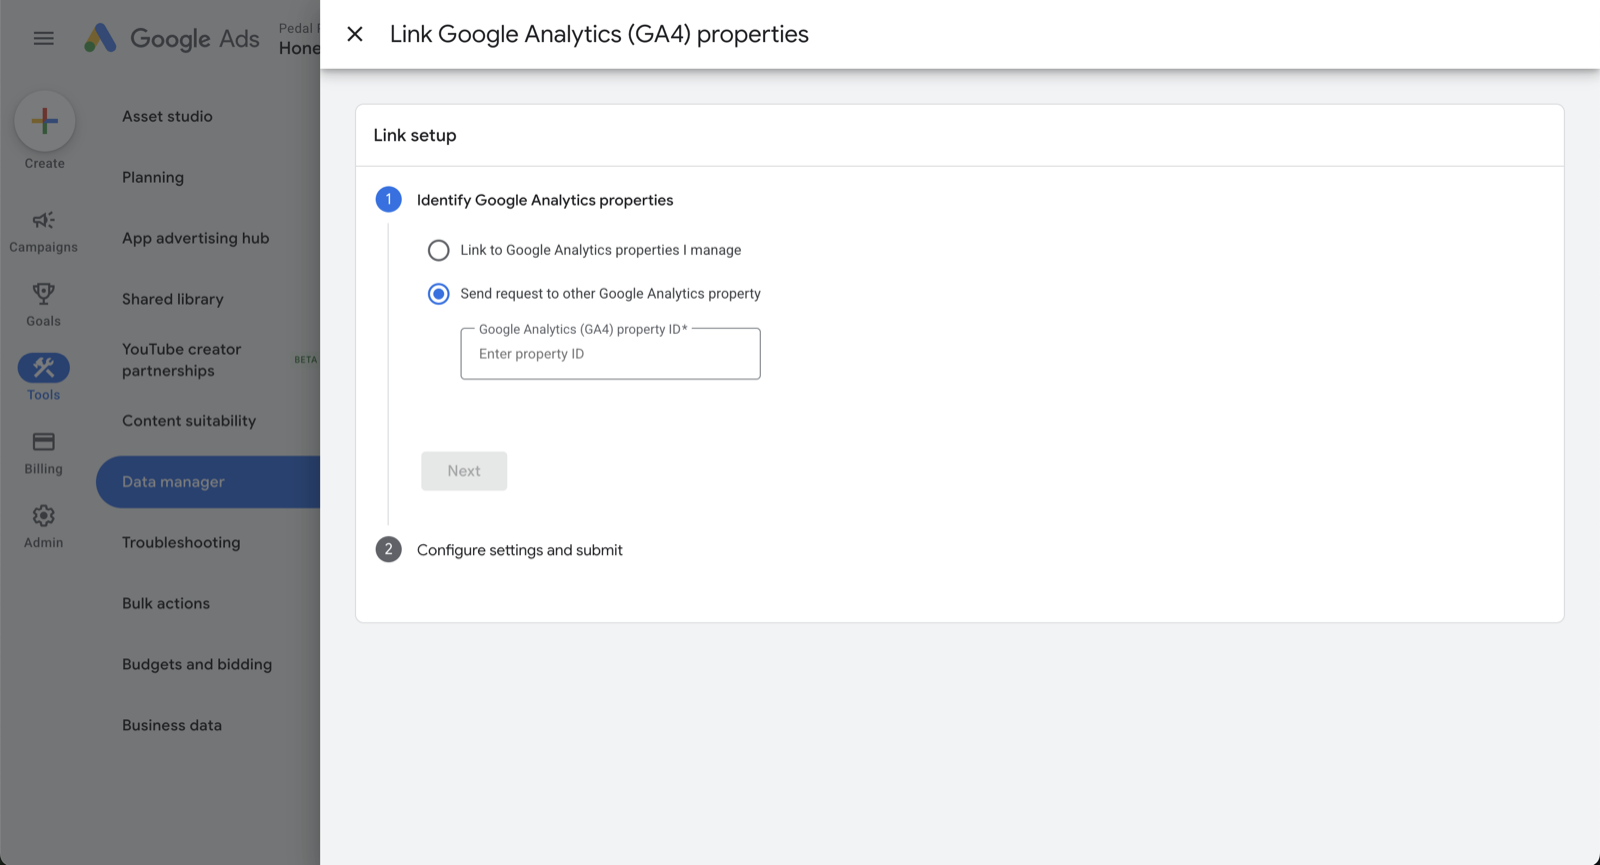
This is the single most under-done step in Google Ads setup, and it's what unlocks proper conversion measurement. In Google Ads, go to Tools → Data manager → Product links → Google Analytics. Find your GA4 property and link it. Approve the link from inside GA4 (Admin → Product Links → Google Ads).
Step 5: Import GA4 conversions into Google Ads
Once linked, your GA4 events become available as Ads conversion actions. In Google Ads: Tools → Conversions → New conversion action → Import from Google Analytics 4. Pick the events that matter (form submissions, phone clicks, purchases) and mark at least one as your Primary conversion.
Google Ads only optimizes campaigns toward conversion actions you've imported and marked as primary. If you skip this step, every campaign you run will optimize for clicks, not customers.
Step 6: Link Google Ads to Search Console
In Google Ads, go to Tools → Data manager → Product links → Search Console. Link your verified Search Console property. This is what lets Google show you, for each paid search campaign, what your organic ranking is for the same query — useful for figuring out where paid is cannibalizing free traffic.
Step 7: Stop here if you're not ready to spend
That's the entire account setup. Building actual ad campaigns — picking keywords, writing ads, setting up audiences, choosing bidding strategies — is the next chapter and outside this guide's scope. The account is now ready when you are.
Reference: Google Ads: create your account.
Set up Google Merchant Center (e-commerce only)
Google Merchant Center (GMC) is where your product catalog lives so Google Ads can run Shopping ads and Performance Max campaigns. If you don't sell physical products online, skip this section. Merchant Center adds no value for service businesses.
Step 1: Create the Merchant Center account
Go to merchants.google.com and click Get started. Sign in with your business Google account. Fill in business name, country of registration, time zone.
Step 2: Verify and claim your website
Merchant Center needs to confirm you own the site selling the products. The fastest path: use the verification you already did in Search Console. Inside Merchant Center, go to Settings → Business information → Website → Verify and claim, and pick the Search Console option. Done in one click if you set up GSC earlier in this guide.
Step 3: Upload a product feed
This is the part that takes the most time, and it depends on your e-commerce platform:
- Shopify: Use the free "Google & YouTube" sales channel. It auto-syncs your products as a feed to Merchant Center. Recommended for almost every Shopify store.
- WooCommerce: Use the free "Google Listings & Ads" plugin from WooCommerce.
- BigCommerce, Wix, Squarespace Commerce: Each has a built-in Google integration in settings.
- Custom platform: Build a feed file (CSV or XML, conforming to Google's product feed spec) and upload it under Products → Feeds.

Step 4: Link Merchant Center to Google Ads
In Merchant Center: Settings → Linked accounts → Google Ads → Link account. Enter your Ads Customer ID and approve the link inside Google Ads.
Step 5: Wait for product approval
Google reviews each product in your feed. Most approve within a few hours, some take a few days. Disapproved products will show in Products → Diagnostics with the reason. Common fixes: add a GTIN/MPN, fix the price/currency mismatch, or add a higher-quality product image.
Reference: Google Merchant Center: create an account.
How these tools talk to each other
You now have six different Google products with overlapping responsibilities. Here's how to think about which one owns what:
- Google Business Profile is your local presence. It feeds Google Maps and the knowledge panel. It doesn't talk to anything else. It's a standalone reputation/discovery tool.
- Google Search Console is your organic-search read. It tells you how Google sees your site and which queries bring you traffic. It feeds data to Google Ads (for organic-vs-paid analysis) and to Merchant Center (for site claim).
- Google Analytics 4 is the measurement source of truth. It's the database that holds every page view, every event, every conversion. Every other tool reads from or writes to GA4.
- Google Tag Manager is the installer. It's the thing that puts GA4 (and every future pixel) on your site, without you needing a developer.
- Google Ads is the traffic engine. It buys paid clicks and reads conversion data back from GA4 to optimize.
- Google Merchant Center is the product catalog. It feeds product data to Google Ads for Shopping and Performance Max campaigns.
The flow at a glance: GTM installs GA4 on your site. GA4 sends conversions to Google Ads. Search Console verifies your domain (which Merchant Center reuses). Business Profile handles Maps separately. Every link is one-time; once they're connected, the data flows on its own.
Once you have GA4, Google Ads, and Search Console set up, Hopkin — the AI marketing copilot we built — can read across all three to answer questions like "which campaigns drove the most appointments last month?" or "what's my organic vs. paid share for the top 10 keywords?" without you ever opening a dashboard. It's available self-serve, and bundled into every Pedal-managed plan. Learn more about Hopkin →
Common mistakes
From auditing dozens of small-business Google setups, these are the mistakes that show up most often. Avoid them and you'll be ahead of 80% of competitors of your size:
- Using a personal Gmail to own everything. The accounts can't be transferred when the owner leaves. Use a business-owned account from day one.
- Skipping Business Profile verification. An unverified GBP listing doesn't show up in Maps results. Start the verification on day one of setup.
- Installing GA4 twice. A hardcoded
gtag.jssnippet plus a GA4 tag firing through GTM means every event counts twice. Pick one path (GTM) and remove the other. - Forgetting to link Google Ads to GA4. Without the link, Ads can't see GA4 conversions. Every campaign optimizes for clicks instead of customers.
- Not importing conversions from GA4 into Google Ads. Even with the link in place, you have to explicitly import each conversion action and mark at least one as primary.
- Wrong time zone or currency in Google Ads. Both are locked once set. Day-of-week reporting and revenue math both break if these are off.
- Inconsistent NAP (Name, Address, Phone). If your Business Profile says "Acme Clinic, 123 Main St, (555) 555-5555" but your website footer says "Acme Aesthetics LLC, 123 Main Street, 555.555.5555." Those are different to Google. Match them character-for-character.
- Letting an outside agency or freelancer create accounts under their login. Always own. Always grant access. Never the other way around.
Frequently asked questions
Most local businesses need four: Google Business Profile (free local presence), Google Search Console (free SEO data), Google Analytics 4 (free measurement), and Google Tag Manager (free tag installer). You only need Google Ads once you're ready to spend on paid traffic, and Google Merchant Center only if you sell products online. Set up the free four first. It costs you nothing and you'll start collecting data you'll thank yourself for in six months.
Google Business Profile, Search Console, Analytics 4, Tag Manager, and Merchant Center are all free. Google Ads is pay-per-click: you only pay when someone clicks an ad, and you control the daily budget. Google Workspace (branded email) starts at $7/user/month, but is optional — a free Gmail account works fine to own these properties.
Create the Analytics property first so you have a Measurement ID to point Tag Manager at, but don't install the GA4 snippet directly — install the GTM snippet on your site, then load GA4 through a tag inside GTM. That way every future tag (Ads conversion pixel, Meta pixel, LinkedIn Insight tag) goes through GTM, and you never have to touch the site code again.
Probably for the first install. GTM gives you two short code snippets that have to go in the <head> and <body> of every page on your site. If you're on Shopify, Squarespace, Wix, or WordPress, there's usually a built-in field or a free plugin that drops the code in for you. Anything more custom and you'll want a developer for a one-time install. After that, every new tag is added inside the GTM UI with no code changes.
Yes, that's the entire reason we tell you to set them up under a business-owned Google account, not a personal Gmail. You can add and remove users in every Google product. Just don't let a freelancer or agency create these for you under their own login — if they do, you'll have to chase them down years later to get the keys back. Own the accounts; grant access.
Skip the sections you've already done: the order in this guide is the easiest one for a brand-new business, not the only one. The only things to check on existing setups: Are they owned by a Google account the business controls? Is GA4 (not Universal Analytics, which Google retired) the active property? Is the GTM container actually firing on the live site? If yes to all three, you're in good shape.
Plan for 3–4 hours of focused work plus a few business days of waiting on verifications. Google Business Profile verification takes 5–14 days by postcard (or instant by video for many businesses). DNS verification for Search Console takes minutes if you have access to your domain registrar. Everything else is account-creation time. The "waiting on a postcard" is the only thing that genuinely takes calendar time — start that first.
Don't install GA4 twice. The single most common mistake we see in audits is a site that has both a hardcoded GA4 snippet (often dropped in by an old developer) and a GA4 tag firing through GTM. Every pageview gets counted twice, every conversion gets counted twice, and the data is unusable for any real decision. Pick one path: load GA4 through GTM, and check the page source to confirm there's no separate gtag.js call.